Saturday, May 30, 2020

BURGER WEEK!

Lamb burgers on split Moroccan bread with tomato-pepper salad and spicy harissa.

Burger week began on Memorial Day with a lack of imagination—your usual ground beef from the supermercado, packaged buns, name-brand ketchup and Ben’s fantastic square-cut olive-oil fries. (National Burger Day was May 28.)


Mid-week, a cache of ground lamb in the freezer inspired me to light the grill and make Moroccan kefta. Only, I remembered that kefta, shaped like a sausage on a skewer, was never very satisfying outside the narrow lanes of the medina in Tangier.  Mainly because, with my rendition, the meat tended to fall off the skewer into the fire. But, burgers would work, on the grill or on the stove.


Serve the bread in wedges or slice it open for burger buns.

Instead of buns, I served the burgers with Moroccan bread, khobz, a round, flat loaf that is cut in wedges. Sliced open horizontally, the wedges make perfect buns for kefta or burgers. All they need is a squirt of hot harissa and Moroccan tomato-pepper salad-relish.

We’ll finish the week with fish burgers—hake cakes (like cod cakes) served on toast, slathered in garlicky green sauce.


Harissa red chile paste is a spicy accompaniment to lamb burgers.


Salad-relish of chopped tomatoes, peppers and preserved lemons to heap on the burgers.


Burger is served with the relish and hot harissa.

Toast the bread or not.

Lamb Kefta Burgers
Hamburguesas de Cordero

Lamb cut from the leg or shoulder is best for these burgers. I like my lamb medium-rare so I shape the burgers really thick. With thick burgers and a hot grill pan, cooking takes only a few minutes. Shape them to suit yourself and adjust cooking time to your tastes.

Skewered kefta.

If you prefer to make keftas, take a golf-ball sized piece of the burger meat and shape it around a metal skewer, pressing to make a compact sausage. Cook the skewers on a grill or under the broiler.


Makes 4-6 burgers.

Ground lamb patties with spices and cilantro.


1 ½ pounds ground lamb
¼ cup finely chopped onion
1 clove minced garlic
2 tablespoons chopped cilantro
2 tablespoons chopped parsley
Pinch of dried mint
1 teaspoon salt
Freshly ground black pepper
1 teaspoon sweet pimentón (paprika, not smoked)
½ teaspoon smoked pimentón
1 teaspoon cumin
Olive oil for grilling the burgers
To serve:
Bread or buns
Tomato-pepper relish to accompany
Harissa chile paste to accompany

Place the lamb in a bowl. Add all the remaining ingredients except the oil. Use a fork to lightly mix the meat. Allow to stand at room temperature for 30 minutes. 

Shape meat into burgers of desired size and thickness. 

Prepare grill, if using, or heat a plancha grill pan or heavy cast iron skillet. Drizzle or brush the burgers with oil. Cook them, turning once, to desired doneness, 2-4 minutes, depending on thickness. 

 Serve the burgers on quartered Moroccan bread, split horizontally, or on burger buns. Accompany with tomato-pepper relish and harissa chile paste.

Burger bun is a quarter of round loaf, split horizontally.


Tomato-Pepper Relish
Ensaladilla de Tomates y Pimiento

Preserved lemon.
Brine-cured Moroccan preserved lemon adds a special tang to this relish. Use the chopped rind, with or without the flesh and membrane. If preserved lemon is not available, use chopped green olives plus grated lemon zest. 

The salad can be prepared in advance and refrigerated, covered, until ready to serve. The salt draws the liquid out of tomatoes and cucumbers. Use a slotted spoon to serve the salad. (Use more bread to mop up the juices remaining.)

Add hot harissa to the salad or serve it on the side for everyone to add to taste.

Add caption
Makes enough for 4-6 burgers.

1 cup finely chopped tomatoes
¼ cup finely chopped spring onions
¼ cup finely chopped green pepper
¼ cup finely diced cucumber (optional)
2 tablespoons chopped cilantro
2 tablespoons chopped preserved lemon
1 tablespoon extra virgin olive oil
½ teaspoon salt
2 teaspoons fresh lemon juice
Harissa chile paste (optional)

Combine the tomatoes, onions, green pepper and cucumber, if using, in a bowl. Add the cilantro, preserved lemon, oil, salt, lemon juice and harissa, if using. Toss lightly. 

Relish can be made in advance and refrigerated, covered, for several hours. Use a slotted spoon to spoon it onto burgers.

Harissa Chile Paste
Salsa Picante

Moroccan “ketchup.” This spicy- hot condiment is available in jars and squeeze tubes from specialty food shops. It’s made with ground chilies. However Spanish “hot” pimentón picante (paprika, not smoked), makes a perfect substitute for grinding peppers. It is way spicier than ordinary sweet pimentón/paprika but not as hot as cayenne. It’s usually served in small pots with any Moroccan meal.

1 tablespoon hot pimentón (paprika, not smoked)
2 tablespoons boiling water
1/8 teaspoon salt
1 teaspoon olive oil

Place the pimentón in a small, heat-proof bowl. Stir in the boiling water until smooth. Stir in the salt and oil. Store, refrigerated, for up to a week.

Moroccan Bread (Khobz)
Pan Marroquí

Not a flatbread, but a flattened loaf with a springy crumb.


This flattened round loaf, cut into wedges, is served with every Moroccan meal. It is traditional with all kinds of tagine.

I’ve used fresh yeast because that’s what I’ve got. You can substitute 1 envelope active dry yeast.

Makes 2 (9-inch) round loaves.

1 ounce pressed fresh yeast
1 teaspoon sugar
1 ¼ hand-hot water (1l0ºF)
3 cups bread flour + additional for the board
1 cup whole wheat flour
2 teaspoons salt
2 tablespoons olive oil + additional for oiling bowl and pan
Semolina for baking sheet
¼ teaspoon aniseed (optional)
2 teaspoons sesame seed (optional)


Crumble the pressed yeast into a small bowl. Add the sugar and ¼ cup of warm water. Stir to dissolve the yeast and allow it to stand for 5 minutes until bubbly.

Place the two kinds of flour in a large bowl. Stir in the salt. Make a well in the center. Pour in the yeast, the remaining warm water and olive oil. Use a wooden spoon to gradually mix the flour into the wet ingredients. 

Once the dough comes together in a mass, turn out onto a lightly floured board. Knead the dough 5-10 minutes until smooth and stretchy. Add only enough flour to keep the dough from sticking. It will become less sticky with kneading. Gather the dough into a ball. Invert the mixing bowl on top of the dough and leave it on the board for 15 minutes (or up to 1 hour). 

Knead the dough again until smooth. Knead in the aniseed, if using. Lightly oil the mixing bowl. Divide the dough into two equal-sized balls. Roll them in the oiled bowl.

Press the ball of dough to flatten it.

Prepare a rimmed baking sheet by oiling it lightly and sprinkling with semolina. Place the balls of dough on the sheet. Pat them into rounds approximately 2 inches thick. If using sesame, sprinkle it on the tops and press it into the dough.

Cover the dough with a clean dry cloth and leave in a warm place to rise for 2 hours.

Heat oven to 400ºF.

After rising, prick the dough with a fork before baking.
Prick the rounds of dough with a fork. Bake until the breads are golden and sound hollow when tapped on the bottom, about 40 minutes.
 
Cool the bread on racks. Serve it, cut into wedges, in a cloth-covered bread basket with any Moroccan-style meal. 


References for Moroccan food:
Moroccan Cuisine by Paula Wolfert (Grub Street; 2004)
The Scent of Orange Blossoms—Sephardic Cuisine from Morocco by Kitty Morse and Danielle Mamane (Ten Speed Press; 2001).
Taste of Maroc by Christine Benlafquih.

More burgers:

More buns:

More recipes to serve with Moroccan bread:


Saturday, May 23, 2020

SUSHI, OLÉ!

An afternoon's entertainment--creating sushi with Spanish flavors.

What a fun project for a day of kitchen quarantine! Make sushi! 


Rummaging in the nether regions of my cupboard, I pulled out a big bag, tightly knotted, of unknown contents. Opened, it revealed a dozen packets of various Japanese ingredients. Some had labels only in Japanese and others I identified by the photos on the package (instant dashi—Japanese stock/soup). Only the cellophane sleeves of nori, the algae wrap used for sushi, were obvious.

Spanish paella rice for sushi? Sure.
I’ve never made sushi before. I had frozen shrimp and squid, but no fresh fish for serving raw. I didn’t have any “sushi rice,” a Japanese short-grained variety. I wondered if Valencian paella rice, which is a medium-short-grained variety, would work instead. Considering paella rice, I thought, “why not add some saffron to the rice?” Roll it in nori around a few gambas (shrimp), calamares and strips of red pepper?

There were a few more adjustments. Not having a flexible bamboo mat for rolling, I improvised with a dampened kitchen towel. (An on-line suggestion to cover the towel with plastic wrap did not work, as the cling-film clung, tearing the sheet of nori.) And, with an induction cooktop, how to toast the nori? Another helpful online video showed how to toast the nori by passing it over the top of a bread toaster.

Unfortunately, no wasabi, that pungent green horseradish that adds such a kick to sushi, remained in the trove of Japanese foods. I decided to forego the soy dipping sauce too. Instead, I used Spanish flavors—a pungent alioli (garlic mayonnaise) made with olive oil, of course, and a sprinkling of smoked pimentón (hot paprika). Sushi olé!

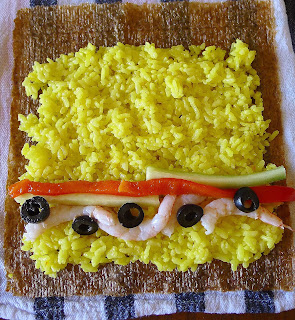
Rolled sushi with saffron rice, shrimp and red peppers.  They're kind of raggedy for a first attempt--but taste great.


No wasabi! Instead, a dollop of garlicky alioli.


Rolled nori sushi, bottom right, and hand-pressed sushi with squid, pimentón and olive oil.


Spanish Sushi Rice
Arroz para Sushi al Español

Having never before made sushi, I referred to the instructions in Japanese Cooking—A Simple Art by Shizuo Tsuji.

Sushi rice is supposed to be light, but sticky enough to hold together when gently compressed. Spanish paella rice (sénia and bahía varieties) seems to work just fine. The rice is washed in several changes of water (unlike the procedure for cooking paella). It needs less cooking water—2 cups water to 1 ½ cups of raw rice. 

You’ll need a deep pot for cooking the rice, so that it doesn’t boil over (mine did) during the high heat initial step.

Sushi rice, by the book, is made with a vinegar dressing containing sugar. I omitted the sugar. I added 1 teaspoon of PX Sherry vinegar. The kombu (kelp) flavors the rice. Omit it if not available.

For the vinegar dressing:
4 tablespoons rice or white wine vinegar
2 teaspoons salt
1 teaspoon PX Sherry vinegar (optional)
3 tablespoons sugar (optional)

For the rice:
1 ½ cups paella rice
2 cups water
2-inch piece of kelp (kombu)
Pinch of saffron threads, crushed (optional)

Combine the vinegar, salt and sugar, if using, in a small saucepan. Bring to a boil and remove from the heat. Stir to dissolve the salt and sugar. Cool completely.

Place the rice in a bowl and cover with water. Stir it around and drain through a fine sieve. Repeat, sluicing the rice in fresh water until the water runs clear (six to eight times). 

Place the rice in a deep cooking pot with the 2 cups of water. Add the kombu and stir in the crushed saffron, if using. Let the rice stand 5 minutes. Bring the water to a boil. Skim out the kombu and discard it. Cover the pot and boil the rice 2 minutes. Lower heat to medium and cook 5 minutes. Reduce heat to very low and cook until all the water has been absorbed, 10-12 minutes more. Turn off the heat and let the rice stand with lid on for 15 minutes.

Fan the rice to cool it. This sushi rice has saffron!


Empty the rice into a shallow wooden or plastic bowl or tray. Use a wooden paddle or spoon to gently toss the rice, scooping it with horizontal, cutting strokes. Drizzle over some of the vinegar dressing and continue tossing. Alternate fanning the rice with a hand-fan (or folded newspaper) and tossing, while adding all of the dressing. Once the rice has cooled to room temperature, cover with a damp cloth until ready to use. 


Rolled Nori Sushi with Shrimp

When working with the rice, dip your hands in vinegar-water to keep the rice from sticking. Dip the knife in water when slicing the rolls.

I’ve used shrimp, red peppers and cucumbers for crunch in my “Spanish” sushi. 

8 ounces whole small shrimp
Salt
Ice water
Roasted and peeled red pepper or canned pimiento
½ cucumber
Sliced olives (optional)
3 nori sheets, toasted
¼ cup water
2 teaspoons vinegar
Sushi rice

To keep shrimp from curling during cooking, skewer them with a toothpick (optional). Bring a pan of salted water to a boil. Have ready a bowl with ice water. Cook the shrimp for 2 minutes. Skim them out into the ice water to stop the cooking. When they are cool, drain and peel them (taking care to discard picks).

Cut red pepper into thin strips. Peel cucumber and cut lengthwise into thin strips. 

Combine the water and vinegar in a shallow bowl and place it next to work surface.

Spread bamboo mat (or substitute a slightly dampened towel) on work surface). Lay a sheet of nori on top. Dip hands in vinegar-water. Scoop up a handful of rice and pat it over the surface of the nori, leaving the top ¼ uncovered.

To spread the rice, dip hands in vinegar-water to avoid its sticking.


Lay a row of shrimp, strips of red pepper, olives and cucumber across the bottom of the nori sheet. Hold the row of ingredients in place with fingertips and use your thumbs to lift the edge of the mat. The edge of the nori nearest you should be lifted over to meet the top edge of the nori sheet

Firmly press the mat around the roll for about 30 seconds to shape it. Carefully release the sushi roll from the mat onto a cutting board. Use a wet knife to slice each roll in half and each half into 3 or 4 crosswise pieces. Arrange them, cut sides up, on a serving platter.

Hand-Pressed (Spanish) Sushi with Squid

The classic nigiri-sushi usually features raw fish such as tuna, bream or salmon. I had squid fins in the freezer, so that’s what I used. (Any part of the squid can be used.) Use a sharp knife to score the flesh in a cross-hatch. Drop into lightly salted boiling water for 30 seconds. Squid will curl into a cone. Skim out and drop into ice water. Drain and cut the squid into small pieces.

Sushi rice
Vinegar-water for dipping hands (see above)
Cooked squid
Smoked pimentón, preferably hot
Coarse salt
Extra virgin olive oil
Alioli (optional)

Dip hands in the vinegar-water and scoop up about 1 ½ tablespoons of rice. Press gently into a wad. Shape it into a rectangular finger shape. Press a piece of squid into the top. Place on a tray and sprinkle with pimentón and salt. Drizzle lightly with oil. Transfer to a serving platter. Top with a dab of alioli, if desired.

Sushi “Paella” (Scattered Sushi)

Is it paella? No, it's a rendition of scattered sushi, using saffron rice.

Sushi rice with saffron
Cooked shrimp
Cooked squid
Strips of red pimiento
Cooked peas
Sliced black olives
Peeled lemon sections

Lightly pack the rice into a shallow bowl. Scatter the shrimp, squid, pimiento, peas, olives and lemon on top. 


Japanese Cooking—A Simple Art by Shizuo Tsuji (Kodansha International; 1980).


More recipes with kombu and nori seaweed here.

Saturday, May 16, 2020

CONJURING FROM THE CUPBOARD (2)

Cod fillets from the freezer, canned piquillo peppers from the cupboard--dinner is ready in no time.

Last week, after a shopping trip to the Coast, I regaled myself with fresh seafood—calamares for squid sandwiches, a pair of dorada (gilt-head bream) for roasting and gambas, head-on, never-been-frozen,  shrimp. This week, it’s back to frozen fish—a packet of cod fillets.


I imagine most of you, living with restrictions on shopping, are making omissions and substitutions in favorite recipes. Me too. My plan is to use the frozen cod in place of dry salt cod in a traditional recipe for bacalao a la Bilbaina, cod as prepared in Bilbao (Basque Country). Instead of roasted bell peppers, I’m subbing canned piquillo peppers.

Canned piquillo peppers.

Piquillos are one of my pantry staples. These small, fire-roasted peppers add a bittersweet piquancy to any dish.

Use any white fish fillets, fresh or frozen and thawed, for this quick and easy preparation. If you don’t have piquillos, use ordinary canned pimientos or fresh bell peppers, roasted and peeled.

The peppers and garlicky oil make the sauce for the cod. Serve with fries or boiled potatoes.


Flecks of chile add to the flavors of sweet and piquant piquillo peppers.


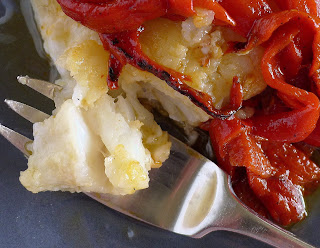
Pretty good for frozen fish! Simmered in olive oil, the cod stays moist.


Cod with Red Peppers, Bilbao Style
Bacalao a la Bilbaina

Serves 4.

1 ½ pounds cod fillets, thawed if frozen
1 can piquillo peppers, drained
¼ cup olive oil
5 cloves garlic
2 teaspoons Sherry vinegar
Salt
1 small dry chile, sliced crosswise
1 tablespoon flour
6 tablespoons water


Sauté strips of peppers.

Slice or tear the peppers into strips. Chop one clove of garlic. Heat 1 tablespoon of the oil in a small skillet and sauté the pepper strips on medium heat, stirring, until they begin to brown, 5 minutes. Season them with salt and stir in the vinegar. Remove the peppers and keep them warm.


Heat remaining 3 tablespoons of oil in a cazuela or skillet. Slice the remaining 4 cloves of garlic and add to the oil with the chile. Fry until garlic just begins to turn golden. Skim out the garlic and chile and reserve.

Remove the cazuela from the heat and stir in the flour.
Place the pieces of cod, skin side down, in the cazuela in one layer. Return it to the heat for 2 minutes, shaking the cazuela to mix the flour and oil with the cod.

Shake and swirl the cazuela to mix. Add 1 tablespoon of the water. Shake, rock and swirl the cazuela. Then add another tablespoon of water. Continue, adding 6 tablespoons of water. Cook on moderate heat, swirling and shaking the pan, until fish is just cooked through, 4-5 minutes, depending on thickness.

Place the fish on heated plates. Divide the peppers between the cod fillets, heaping them on top. Scatter the reserved bits of garlic and chile over the peppers. Spoon the oil remaining in the pan over the fish and peppers. Garnish with sprigs of parsley.


Another recipe for frozen cod:
Batter-Fried Cod with Piquillo Alioli.

More recipes with piquillo peppers:
Piquillo Pepper Dip.
Eggplant Rollups with Piquillo Pepper Sauce.
Potato Roulade with Piquillo Peppers.
Piquillo Pepper Ketchup.

Lockdown update: In Spain's gradual de-escalation from strict stay-at-home rules, Málaga province, where I live, on Monday will begin Fase 1 (an advance from phase 0!), allowing gatherings of up to 10 people and the opening of shops (not dine-in restaurants). Some Madrileños are banging on pots and pans to protest being stuck in Phase 0. Mercifully, the number of new cases and fatalities across the country continues to fall.

Last week's fresh fish--gilt-head bream roasted with potatoes and zucchini (Recipe is here.)

Saturday, May 9, 2020

THE TAPAS FIX

“I miss going out for a tapa and a beer,” said Ben, early in the lockdown. “Tapas sort of sanction having a few beers," he added, popping open another one. 


Are you too needing a tapas fix? Missing the evening stop at a tapa bar for a caña (draft beer) and a tapa of fried calamares or chunky tortilla or ensaladilla rusa (a type of potato salad), with the laughter and chatter, the noisy throngs at the bar jostling to get another beer and a plate of croquetas?

To ease the withdrawal pangs, I propose cooking some popular tapa foods to enjoy at home. This one, bocata de calamares, fried squid sandwiched in a roll, will fix the need to have a few beers—but not the yearning for the action, the buzz, of the tapeo.

Famous in Madrid--rings of fried squid in a crusty roll, cold tap beer. I'm serving the sandwiches with three versions of alioli garlic sauce.

Bocata de calamares is emblematic of Madrid’s Plaza Mayor, a place usually packed with folks out on a tapas crawl, now eerily empty. With a few variations, it’s also popular in Zaragoza and in the Basque Country.

The classic bocata is no more complicated than rings of fried squid stuffed in a split crusty roll or baguette. It’s become customary to serve with alioli (garlic mayonnaise) or, in Zaragoza, a spicy brava sauce. From there the variations begin—different breads (rolls tinted black with squid ink); different additions such as fried onion rings or lemon confit; different sauces. I decided to make three variations on alioli, garlic mayo.

The basic squid sandwich.

Use a crusty bollo, sandwich roll, or a baguette cut  into sections. Slice to open lengthwise, but don't slice all the way through.

Spread the bread with alioli sauce or spoon it right onto the squid.

This version of alioli has smoked pimentón and chopped piquillo peppers.


Fried rings of squid, ready for stuffing in bread rolls.

These two fresh squid were cleaned for me at the market. Cleaned, together they weighed about 1 pound. They made enough for three sandwiches, but we ate some of the fried squid straight out of the frying pan!


A couple of fresh squid, each a little less than a pound before cleaning, cost me about $12. They were worth the price! If possible, use fresh squid, not frozen, for this recipe. Avoid pota, a related variety that tends to be tougher than calamares.

Squid contains a lot of moisture and, even when coated in flour, tends to spit and splatter when put into the hot oil. Most recipes recommend drying the rings of squid on paper towels before dredging them in flour. However, I watched a video clip of three-star Chef Dani García frying squid. He scooped the pieces directly from a bowl of water into the flour and right into the oil. His looked way better than mine, that had been carefully dried before flouring. His didn't splatter, but neither did mine. (I'm wondering if the splattering hot oil happens when using thawed frozen squid, rather than fresh??)

Soaking the cut-up squid in milk is an optional step. Some cooks say it tenderizes the squid, others claim it reduces the splattering.

It's important to shake off excess flour before frying.
Be sure to shake off excess flour in a sieve before placing the squid in the oil. Take care not to lean over the pan, as squid can splatter.


Fried Squid Sandwich with Alioli Sauce
Bocata de Calamares

Serves 2-3.

2 medium squid (about 1 pound cleaned)
Milk (optional)
1/3 cup flour
1/3 cup chickpea flour
Salt
Olive oil for frying
Crusty sandwich rolls or baguette
Alioli sauce to serve (recipe follows)
Lemon wedges to serve

Use a sharp knife or kitchen scissors to cut the squid into 1/2-inch wide rings.

Cut the body sac of the squid crosswise into ½-inch-wide rings. Cut the tentacles in two or three pieces. (Save the fin flaps for another use, such as fish stew.)  Wash the pieces of squid and place them in a bowl. Cover with milk and refrigerate, covered, while making the sauce (or overnight).

Combine the flour, chickpea flour and ½ teaspoon salt in a shallow pan. Place oil in a deep skillet to a depth of 1 ½ inches. 

Drain squid. Rinse it in water and drain again. Pat the squid dry with paper towels. 

Heat oil until shimmering, but not smoking (360ºF).

Mix two kinds of flour for dredging the squid rings.

Dredge the pieces of squid in the flour. Place them in a sieve and shake off excess flour. Carefully place squid into the hot oil. Don’t crowd the pan. Fry until lightly golden, turning once, if necessary. Skim out and drain on absorbent paper. Continue frying pieces of squid.

Sprinkle lightly with salt.

Cut the baguette, if using, in half or thirds. Slice them (or the sandwich rolls) open without cutting through. If desired, spread some of the sauce on the bread. Tuck as much of the squid as possible into the rolls. Serve remaining sauce and lemon on the side.


Alioli Garlic Sauce with Variations
Alioli con Variaciones

An immersion blender works best for making the sauce.

Extra virgin olive oil, egg, garlic and lemon juice.

1 whole egg
1 clove garlic, chopped
¾ cup extra virgin olive oil
½ teaspoon salt
3 tablespoons fresh lemon juice

Put the egg, garlic and oil into the blender container. Blend at high speed, without moving the wand up and down, until the sauce thickens and emulsifies. Then raise and lower the wand until all the oil is incorporated. Add the salt and lemon juice and blend again. 

Store the alioli, covered and refrigerated, for up to 2 days.

Three flavor variations to alioli:


Add chopped black garlic, parsley and grated lemon zest to the alioli.

Fermented black garlic.


Add chopped piquillo peppers and smoked pimentón picante (hot paprika) to the alioli.


Add chopped scallions, cilantro and jalapeño peppers to the alioli.


Three variations on the basic alioli--top, cilantro and jalapeño; right, chopped piquillo peppers and smoked pimentón, and left, chopped black garlic and lemon zest.


More sauces to serve with squid sandwich:

More tapas ideas:

Lockdown update. Easing of restrictions is coming—in Phase 1 terrazas (outdoor cafés) can open, with adequate spacing of people. By Phase 2 restaurants and bars can serve customers up to a third of capacity. When? Parts of Spain begin opening this coming Monday. But, Málaga (the province where I live), Granada, Madrid and Barcelona are still in Phase 0. No tapeo in the near future.

Saturday, May 2, 2020

WHEN THE BREAD IS GONE—MAKE MOLLETES

Baking bread in an emergency. These are molletes, soft sandwich buns, typical of Andalusia.

It’s finally happened—we’ve run out of bread. I bought two big country loaves when I shopped last week and stashed them in the freezer. But two guys (Ben and grandson Leo) making sandwiches quickly finished the supply. It will be several days before one of us goes out to shop. Looks like it’s time to make bread.


When my kids were growing up (in the 1970s), I baked bread once a week. We had a buying cooperative to purchase wheat in quantity, taking turns to take it to a small mill in a nearby town. The fresh, whole-grain flour was divided between several families. I got masa madre (sourdough starter) or fresh yeast from a local panadería (bread bakery). I rarely make bread anymore. But here we go!

Luckily, I have both yeast and bread flour in the pantry. There’s no shortage of yeast in my locality, so I´m not joining the sourdough brigade just yet.

Since the kids are into sandwiches, I decided to make molletes, sandwich buns. Yes, Spain has marvelous crusty rolls, but these are not them. Molletes have a soft crust and spongy crumb. And pale. They are not golden-toasty. They’re floury-white. Molletes just beg to be toasted or grilled, whole or split.

Traditional breakfast: mollete with olive oil.

A bread made traditionally in the inland Málaga town of Antequera, the mollete has become popular throughout Andalusia. Stop at a roadside venta for breakfast (oh, wait, I’m forgetting that you’re not allowed to be out on the carretera, nor are restaurants open yet), and an option is toasted mollete served with olive oil, tomato and thinly sliced serrano (or ibérico) ham.


Top the mollete with tomato or ham or both.


But molletes lend themselves to any sort of filling. They are perfect hamburger buns. They are a traditional bun for spreading pringá, the fatty meats and sausage left from puchero.

Store molletes in a cloth bag. They don’t keep more than a couple of days but can be resuscitated by toasting. Toast them, split, in a toaster or on a ridged grill pan.

Variations on the theme: Substitute whole wheat flour for some of the white bread flour. Add sesame seed or cumin to the dough. Make black buns by mixing squid ink into the dough. (Yes, I have sampled such a thing.)  I'm supposing that all-purpose flour would work for these buns, if you don't have bread flour.

A perfect breakfast, lunch or snack--split and toasted mollete with olive oil, tomatoes and ibérico ham.


Or, serve the mollete with semi-cured goat cheese. Raw onions, if you like.


Molletes are the perfect burger buns. Toast them in the toaster or on a ridged grill pan.


Sandwich Buns
Molletes

About yeast: Fresh yeast comes in a cake and is easy to crumble. Keep it refrigerated up to 2 weeks or in the freezer. To activate the yeast, use water hot from the tap or heated so that you can comfortably stick your fingers into it—about 110ºF. To substitute active dry yeast, use 1/3 of the amount of fresh yeast or, in this recipe, about 1 teaspoon dry (about half of an envelope of dry yeast) for 1 tablespoon of fresh.  

Flatten balls of dough to oval or circle.

To bake: Roll dough into balls and flatten them into ovals or rounds. Place them on baking sheets lined with parchment and sprinkled with a little flour or fine semolina. Dust the tops of the buns with additional flour. Spray them lightly with water. Bake the buns on a single rack in the lower part of a preheated oven. (Use a pizza stone if you have one.) 

Makes 8 buns. 

½ ounce fresh yeast (approx. 1 tablespoon, packed)
1/8 teaspoon sugar
1 1/3 cups hand-hot water (about 110ºF)
4 ¼ cups bread flour + additional for board and pans
2 teaspoons salt
2-3 tablespoons extra virgin olive oil
Flour or fine semolina for baking sheets
Water to spray buns

Crumble yeast into a small bowl. Add the sugar and 1/3 cup of warm water. Stir to dissolve the yeast. Allow to set 5 minutes.

Mix yeast and flour.

Place the flour in a large mixing bowl. Stir in the salt. Make a well in the center and add the remaining 1 cup of warm water and the yeast-water. Use a wooden spoon or paddle to combine the flour and liquid. Mix until it comes together in a ball and all of the flour is combined. Allow the dough to rest 15 minutes.

No flour to knead. Dip hands in oil to prevent sticking.


Place the oil in a shallow bowl alongside the work surface. Scrape the dough onto the board. Dip palms in oil and knead the dough for 3 minutes. As dough becomes sticky, use more oil on the hands. Don’t add additional flour on the board. Gather the dough again into a ball and allow it to rest 15 minutes.

Again, dip hands in oil and knead the dough until smooth and glossy, using more oil as needed. Rest the dough 15 minutes. Repeat the kneading one more time.

Use the oil to grease the mixing bowl. Gather the dough into a ball and place it in the bowl, turning it once to coat the dough with oil. Cover with a clean cloth and place in a warm, draft-free place to rise until doubled in bulk, about 2 hours.

Dough rises 2 hours.
Dough before rising.


Line two baking sheets with parchment. Sprinkle them lightly with flour or semolina.

Buns are ready for the oven. Traditional molletes are oval; round ones are fine too.
Punch the dough down. Lightly flour the board. Turn the dough out. Knead once more until smooth. Divide the dough into 8 equal portions and roll them into balls. Press the balls to flatten them into ovals approximately 4 ½ X 3 inches. Place them 2 inches apart on prepared baking sheets. Dust the tops lightly with flour and cover with cloth. Let them rise 15 minutes while oven heats.

Preheat oven to 425ºF.

Remove cloth from one baking sheet. Spray or sprinkle the tops of the buns very lightly with water. Place the sheet in the lower part of the oven. Bake 5 minutes.

Repeat with the second tray, raising the oven temperature again to 425ºF before baking the buns.
Baked buns are pale, not browned, and crust stays soft.

Freshly baked molletes.


More ways to use mollete buns:

     _______________________________________________________________________

Lockdown update: Starting today, I get to go outside of the house! Mayores (persons over 70) can now go for a walk—from 10 am-12, or from 7 pm-8. Ben can, supposedly, go surfing (from 6 am-10 or from 8 pm- 11), but he’s not allowed to get in a car to get to the coast. (Travel to purchase food or medicine has been permitted all along. In fact, I'm not cooped up in an apartment, but can range around my olive grove and garden.) Lockdown—with gradual easing of restrictions—is to be extended for another two-week period.

The incidence of new cases of coronavirus in Spain peaked on March 26. Madrid and Castilla-La Mancha have had the highest rate of mortality up until now (125 deaths per 100,000 inhabitants). The region where I live, Andalucía, has one of the lowest mortality rates due to the virus, 15 per 100,000 persons.