Saturday, March 26, 2022

BURGERS ARE HAVING THEIR MOMENT


Beefed-up chicken burgers on sesame mollete buns.

In our weekly newspaper I noticed that a local burger joint had competed in the second annual Spanish hamburger championships. A burger competition? Since when are burgers a thing? 


Maybe since Chef Dani García got into the burger act. I first tried his Burger Bull, a burger of rabo de toro (bull's tail) meat on a bun way back in 2010, when Chef Dani had a trendy tapas joint in Málaga. He has since risen to three-star fame at Calima in Marbella, after which he walked away from the high-end restaurant business. He first collaborated with McDonald’s España back in 2015 to create a “gourmet burger”. He’s got a new “signature” burger for McDonald’s, the Bearnesa, with a chimichurri twist on classic Bearnaise sauce, topping a patty of Spanish beef. (One critic commented that it tasted just like a McDonald’s hamburger.) Chef García’s new restaurant in New York, Casa Dani, doesn’t list burgers on the menu. But, leading the tapas is “oxtail brioche,” essentially the same Burger Bull from his original Málaga establishments.

But, back to the championships. The winner was Junk Burger from Madrid, with a patty of vaca rubia gallega, aged cow meat of the Galician Rubia breed, with Cheddar and locally-smoked bacon. Scrolling through the other entries, I surmised that the quality of the meat plus a knock-out sauce were the main criteria. Rubia Gallega and Black Angus seemed the preferred beef. Bacon and Cheddar were frequent accompaniments, although one entry had strips of grilled steak wrapped around the ground beef patty and payoyo goat cheese instead of Cheddar. Some had house-made brioche buns, including one entry colored carmine with beets. 

“Ageing” is relatively new for beef in Spain. Beef used to be yearling beef, ternera or añojo, butchered and sold fresh. That is changing, with superb vacuno and buey available. “Old cow” meat, butchered at five to 10 years, is especially esteemed. Aged up to 40 days, it packs huge beef flavor. Well-marbled flesh makes for juicy meat. That’s what makes prize-winning hamburgers. 

I’m making chicken burgers with an Asian inflection and trying my hand with Dani García’s Burger Bull. A couple of knock-out sauces are based on prepared mayonnaise.

Miso paste punches up the umami when mixed with ground chicken thighs for this burger.


Melted cheese tops a burger of chopped, braised oxtail.


Beefed-Up Chicken Burgers
Burguer de Pollo

I actually prefer chicken burgers to beef. I’m beefing up the flavor with the addition of umami-packing miso paste (made from fermented soybeans) and adding juiciness with ibérico pork tocino (fat). The mayonnaise with soy sauce is a good accompaniment. If I were making fries, they would be sweet potato fries. 

Makes 2 burgers.
 
9 ounces boneless chicken thigh meat, ground
1 tablespoon olive oil
¼ cup finely chopped tocino or bacon (1 ounce)
3 tablespoons finely chopped red onion
1 teaspoon miso paste
¼ teaspoon pimentón de la Vera (smoked paprika)
Freshly ground black pepper
2 sesame buns, split and toasted
Teriyaki Mayonnaise (recipe follows)
Sliced tomatoes
Thinly sliced red onion

Heat the oil in a small skillet with the chopped tocino until tocino releases its fat. Sauté the chopped onion on medium heat until softened, but not browned, 4 minutes. Remove the skillet from the heat and stir in the miso and pimentón. Allow to cool.

Soy-flavored mayonnaise on the burger.
Combine the mixture from the skillet with the ground chicken. Season with pepper. Mix well. Allow to stand 15 minutes, then shape into two burger patties.

Heat skillet on moderately high heat and brush with oil. Sear the burgers, about 2 minutes per side. Lower heat and cover the skillet and cook 2 minutes more.

Spread the buns with mayonnaise. Top with burgers, tomatoes and onion. 

Teriyaki Mayonnaise
Mayonesa de Teriyaki

For 2-3 sandwiches.

2 tablespoons mayonnaise
1 teaspoon soy sauce
½ teaspoon honey
1 teaspoon PX vinegar (or balsamic)
¼ teaspoon sesame oil

Stir the mayonnaise until smooth. Whisk in the soy, honey, vinegar and oil. 
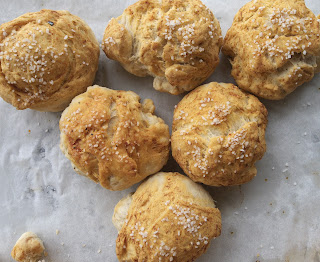
Sesame Buns
Bollos con Ajonjolí para Burguer

Make these buns with molletes from the panadería.


Molletes are a type of round or oblong soft bun popular in Andalusian bakeries. They’re perfect for grilled sandwiches (see campero grilled sandwich). Typically, molletes are big, about 6 inches in diameter, but many panaderías make smaller ones, a perfect size for burgers. 

6 (3 ½-inch) molletes 
1 egg yolk
1 teaspoon water
Sesame seed

Heat broiler to 475ºF.

Place molletes on a sheet pan. Stir the yolk with water. Brush the tops and sides of the molletes with the egg. Sprinkle with sesame.

Grill the buns under the broiler just until the tops are browned, 2-3 minutes. 


Oxtail Burgers
Burguer Bull

Braised rabo de toro, or bull’s tail, is a specialty in Sevilla and Córdoba, where some butchers sell carne de lidia, meat from a toro bravo, after a bullfight. Of course, it doesn’t have to be the tail of a fighting bull. Butcher’s oxtail is just fine. 

In this recipe, the braised meat is removed from the bones, then finely chopped and mixed with some of the gelatin-rich cooking liquid so that, with chilling, it solidifies. I didn’t add enough of the liquid, so the result was more like “sloppy José’s” than burgers! I’ve got more of the chopped oxtail. I’ll serve it with the rich gravy on some mashed potatoes instead of buns.

Make the braised oxtail a day before preparing the burgers, so the chopped meat has time to chill.

1 oxtail (approx. 2 ¾ pounds), cut crosswise
Salt
Freshly ground black pepper
1 teaspoon pimentón de la Vera (smoked paprika)
1 teaspoon oregano
Sunflower oil for searing the meat
2 tablespoons olive oil
1 cup chopped onion
1 cup diced carrot
3 cloves garlic, lightly crushed
1 cup grated tomato pulp
¼ cup brandy
2 cups red wine
4 cups water or beef stock
Strip of orange zest
1 bay leaf
Sprig of thyme
1 clove garlic, peeled

3 tablespoons olive oil
1 cup finely chopped shallots (about 6 shallots)
1 cup chopped mushrooms (2 ½ ounces)

Sliced cheese (such as Manchego or Havarti)
Mini burger buns
Burger Bull Sauce (recipe follows)
Rucula

Season the pieces of oxtail with salt, pepper, pimentón and oregano. Allow to stand for 30 minutes.

Heat a heavy skillet and brush it with sunflower oil. Sear the pieces of oxtail. Remove them when browned on all sides. Reduce heat to moderate and add the olive oil. Sauté the onion, carrot and garlic until onions begin to brown, 5 minutes. Add the tomato pulp and cook 5 minutes more. Return the pieces of oxtail to the pan. 


Braised oxtail.
Pour the brandy over the meat. Either flambé the brandy or cook on high heat until the alcohol is cooked off. Add the wine and reduce it slightly. Add the water or stock, zest, bay and thyme. Cover and cook the oxtail, turning the pieces occasionally, until the meat is fork tender, about 2 ½ hours. (The braised oxtails are ready to eat at this point, should you not wish to use the meat for burgers.)
Chop oxtail for burgers.
Lift the pieces of oxtail out of the pan. When they are cool enough to handle, strip the meat off the bones. Discard excess fat, gristle and the bones. Put the pieces of meat on a cutting board and chop them as finely as possible (or chop in a food processor).

Pour all the remaining liquid in the pan through a sieve. Save some of the diced carrots to add to the burger mix. Discard the remaining solids. Place the strained liquid (about 4 cups) in a saucepan with the clove of peeled garlic and bring to a boil. Reduce heat and let it bubble, uncovered, until reduced by half. Skim out the cooked garlic and save it for the mayonnaise. Reserve the oxtail reduction. 

Heat the 3 tablespoons of oil in a small skillet and sauté the shallots on low heat until they are browned and caramelized, 5 minutes. Remove them and drain excess oil.

Add oil back to the skillet and sauté the mushrooms until lightly browned. 

Combine the mushrooms and shallots in a mixing bowl with the chopped oxtail meat and a few pieces of diced cooked carrot. Add ¼ cup of the reserved oxtail reduction liquid. Combine very well. Taste and season with additional salt and pepper. 

Press chopped meat into a roll and chill.
Shape the meat mixture into a roll 3 inches in diameter. Wrap it tightly in plastic film. Refrigerate at least 8 hours.

When ready to cook the burgers, use a serrated knife to cut 1 ½-inch-thick slices from the meat roll. Sear them on one side in a skillet or plancha. Turn the burgers, top with a slice of cheese, lower heat and cover the pan until cheese melts. 

Place the burgers on toasted buns that have been spread with Burger Bull Sauce. Top with arugula.


Burger Bull Sauce
Salsa Burguer Bull

The trademarked sauce by Dani García is made with sunflower oil, pasteurized eggs and beef extract. My version starts with mayonnaise from a jar. The addition of the reduced oxtail cooking liquid adds gelatin that thickens the mayonnaise further. Use the clove of garlic that cooked in the reduction of the oxtail cooking liquid. 

1 cup prepared mayonnaise
1 clove cooked garlic
½ teaspoon Dijon mustard
3 tablespoons oxtail reduction
1 teaspoon Sherry vinegar
Few drops of Tabasco or other pepper sauce

In a blender combine the mayonnaise, garlic, mustard, oxtail reduction, vinegar and Tabasco. Blend to make a smooth sauce. Add additional vinegar or Tabasco to taste.

More variations on the burger theme:


Nothing to do with burgers, except to explain why my photos have an unnatural yellow cast. This is the view from my kitchen on a day when we had heavy calima, a fog of fine particles of Sahara desert dust in suspension. During the night it rained, lluvia de barro, coating everything--cars, terrace, laundry in red mud.
 

Saturday, March 19, 2022

BEYOND BASIC BREAD

 A pueblo panadería, where bread is made and baked daily, usually makes items in addition to basic loaves and rolls. Nowadays, that includes croissants, empanadas, all sorts of tarts, cookies and muffins. But in earlier times, the extras were confections of bread dough. Where I live (Málaga province), tortas de aceite were one of the baked goods beyond basic bread.


Tortas de aceite are flat buns spiced with cinnamon and aniseed.

The torta de aceite is a big cookie or flat bun. It starts with basic bread dough to which aniseed-flavored olive oil is added. A little sugar in the dough and sprinkled on top makes it perfect as a breakfast bun, served with café con leche, milky coffee, tea or even a copita of aguardiente, anisette. Tortas de aceite are perfect for dunking.

Tortas de aceite are enjoyed for breakfast or snack, with coffee or tea.


Dunk pieces of torta in the coffee, if you like.


A similar olive oil dough in towns of Jaén province is turned into little round rolls called ochíos, or “eighths,” so-called because they were made with an eighth of the bread dough. The ochíos are topped with pimentón (paprika) and coarse salt. They´re perfect for making tiny sandwiches for a merienda, snack. 

Small rolls are brushed with oil and pimentón, topped with coarse salt. 


Ochío rolls can be split and filled for small sandwiches. Typical fillings are chorizo or morcilla. Shown clockwise from the right are salchichón and cheese; marinated fresh anchovies; fresh goat cheese and sliced tomato and, in the center, sliced egg with pickle and mayonnaise.


Basic Bread Dough
Masa Para Pan

Bread flour is harina de fuerza.

Basic “country” bread starts with masa madre, a piece of the fermented dough from a previous baking, to which some fresh yeast is added. I bake bread so seldom that I haven´t bothered experimenting with sourdough. I used instant dry yeast because that´s what I had in my cupboard.  

1 envelope instant dry yeast 
½ teaspoon sugar
1 cup all-purpose flour
½ cup hand-hot water (115ºF)
4 cups bread flour
2 teaspoons salt
1 cup warm water

Day before baking
In a medium bowl combine the yeast, sugar and flour. Add the hand-hot water and mix to make a spongy batter. Cover the batter with a damp cloth and place in a draft-free place to rise overnight (8 hours).

Dough before kneading is shaggy.
For the bread dough
Rinse a large crockery mixing bowl in very hot water to warm it and wipe it dry. Combine the bread flour and salt in the bowl. Make a well in the center. Add the sponge that fermented overnight to the flour. Pour in half of the warm water. With a wooden spoon, begin stirring the flour into the liquid in the center, incorporating the yeast dough. When the dough is too stiff to work with the spoon, add the remaining ½ cup of warm water.

Begin kneading the dough. Work it in the bowl or turn it out onto a board. The dough will be dry and shaggy at first, but becomes smooth with kneading. Knead the dough for at least 15 minutes until it is smooth, stretchy and almost glossy looking. (Use a dough hook on a mixer if you have one.)

Roll the dough into a smooth ball and place it in an oiled bowl. Turn to coat both sides with oil and cover with a damp cloth. Put the bowl in a warm, draft-free place to rise until doubled in bulk, 2-3 hours. The dough is now ready for shaping. (Divide it in half to prepare the two following recipes.)


Olive Oil Breakfast Buns with Aniseed
Tortas de Aceite con Matalahúga

Dough with spiced olive oil.

Makes 12 (3 ½ -inch) buns.

16 ounces bread dough (½ of previous recipe)
½ cup extra virgin olive oil
1 strip orange zest
1 teaspoon aniseed
¼ cup + 2 teaspoons sugar
½ teaspoon baking soda
½ teaspoon cinnamon
½ cup all-purpose flour
12 almonds

After the bread dough has risen, as described in the previous recipe, punch it down and place in a bowl. Make a depression in the dough.

Combine the oil in a saucepan with the orange zest and heat over medium heat until the zest begins to turn brown. Remove from the heat and stir in the aniseeds. Let the oil cool, then remove and discard the orange zest. Stir the ¼ cup sugar, baking soda and cinnamon into the cooled oil.

Pour the oil mixture into the depression in the dough and begin kneading it in. Sprinkle with some of the flour and continue working the oil into the dough, gradually adding the remainder of the flour. When most of the oil has been absorbed, turn the dough out onto a board and knead it for a few minutes. The oil in the dough keeps it from sticking, so you probably don’t need additional flour.

Place the dough in the bowl, cover with a cloth and allow it to rest for 30 minutes.

Make balls of dough, pat into flat circles.

Line a baking sheet with baking parchment. Divide the dough into 12 pieces (each about 2 ounces). Roll each piece into a ball and pat it into a 3 ½-inch circle. Place on the prepared baking sheet. Sprinkle the tops with the remaining sugar. Place an almond in the center of each. Let rise in a warm place for 30 minutes.

Preheat oven to 375ºF. 

If baking two sheets of buns, place them on upper and lower oven shelves. Bake 10 minutes, then switch positions of the sheets. Bake until the buns are golden, about 20 minutes total. Cool the buns on a rack.


Olive Oil Rolls with Pimentón
Ochíos (Bollitos con Pimentón)

Mix pimentón and olive oi.

These rolls are savory, but are made with a pinch of aniseed in the dough. On a whim, I omitted the aniseed and used poppy seeds instead. Use pimentón de la Vera (smoked paprika) mixed with olive oil to brush on the rolls before baking them. Any remaining oil can be brushed on the rolls again after baking for a deeper color.

16 ounces bread dough (about ½ of previous recipe for Basic Bread Dough)
¼ cup + 1 tablespoon extra virgin olive oil
¼ cup all-purpose flour
½ teaspoon aniseed or poppy seeds
1 teaspoon smoked pimentón (paprika)
1 teaspoon coarse salt

After the bread dough has risen, as described in the previous recipe, punch it down and place in a bowl. Make a depression in the dough. Pour the ¼ cup oil into the depression. Use a wooden spoon or hands to gradually mix the oil into the dough, adding the flour as needed. 

When most of the oil has been absorbed, turn the dough out onto a board. Knead in the aniseed or poppy seeds. When the dough is smooth, place it in a bowl, cover with a damp cloth and let it rest 30 minutes.

Line a baking sheet with parchment. Divide the dough into 8 pieces (each about 2 ½ ounces). Roll each piece into a smooth ball, flatten it slightly and place on the baking sheet. 

Combine the remaining 1 tablespoon oil with the pimentón. Brush the tops of the rolls with the pimentón oil. Sprinkle the tops with the salt. Let rest 30 minutes.

Preheat oven to 375ºF.

If baking two sheets of buns, place them on upper and lower oven racks. Bake 10 minutes, then switch positions of the sheets. Bake until the buns are golden, about 20 minutes total. Cool the rolls on a rack. If desired, brush tops with remaining pimentón oil.

Brush rolls with more pimentón oil after baking.


Split the rolls for sandwiches.


More variations on basic bread:
Crispy Olive Oil Cookies (Tortas de Aceite). These tortas are different from the ones in the recipe above. They are rolled very thin and baked until crisp. They are not at all “bready.”


Saturday, March 12, 2022

TRADITIONAL VILLAGE COOKING

 A traditional pueblo salad, salmorejo, with oranges, onions, olives and cod, looked so colorful when she placed it on the table that Remedios Valenzuela decided to photograph the plate. “That´s how I started,” said Remedios, 59, whose collection of recipes and village lore has been published by the Museo Histórico Etnológico de Mijas. “Every day I took a picture of what I cooked, downloaded it in the computer with the recipe.” As the project grew, she dug deeper into the local culture, talking to her parents and other older villagers, to dig out recipes for traditional dishes.


Collection of 63 traditional recipes.
She entered her collection of recipes, history, family reminiscences and photos in the Mijas bi-annual awards for research in ethnography and history. Her project won the ethnography award and the result is a book, Gastronomía Tradicional Mijeña (Traditional Mijas Cooking), published 2022 by Colección Osunillas, Museo Histórico Etnológico de Mijas. 

I was so excited to get my hands on this book! I learned Spanish cooking in the kitchens of Mijas, where I have lived for more than 50 years. My neighbors were delighted to talk about food. One kitchen led to another. An inquiry about new dishes got me sent off to a friend, a tía, the abuela, who could show me how to make them. I filled notebooks with local recipes, often dozens of versions of the same dish. My first cookbook, Cooking in Spain, is dedicated to “the women of Mijas who took me into their kitchens.” Most of those dishes and holiday sweets as well are included in Gastronomía Tradicional Mijeña.

Remedios (she is known as Reme) said she grew up eating traditional food and continues to cook it in her own kitchen. She said she fears the old dishes and the traditional Mediterranean diet are being lost, as younger generations turn more and more to ready-made foods. 

Mainly, she explains, she wanted to preserve the old dishes, in all their variety and richness, “to respect and protect our simple and humble roots”. The book, she writes in the dedication, is in memory of those who came before, in homage to those yet among us and as a legacy for those who might come after. 

Reme´s parents’ generation came of age in the “tiempo de hambre,” the “time of hunger” that followed the civil war. “In those times,” she writes, “food was so scarce that they sometimes had to resort to the picaresque and audacity just to be able to take home a crust of bread or handful of figs.” People who had a plot of land to grow food could manage to fill the olla with hot soup, but those with no land had to resort to begging, or scavenge for firewood to carry to the panadería for a few coins or a loaf of bread. 

Many people, even in the village, kept laying hens. The eggs were not for family consumption, but were collected by the recovera, a woman who peddled them in Málaga city and brought back in exchange products not available in the pueblo. Subsistence living.  

“Because of that,” she writes, “many of our typical dishes are made up of simple ingredients related to the land and the sea, such as potatoes and sweet potatoes, figs, chickpeas, olive oil, flour, fish, milk.” 

“Today we should be grateful for the richness and variety of typical Mijas dishes,” she writes. Many are still daily fare. “We should feel proud to be able to present, enjoy, and continue to preserve them.” 

Remedios Valenzuela
I got together with Reme in her modern kitchen to make one of the recipes from her book. Reme seemed pleased with the recipe I chose, Cazuela de Patatas con Pollo, a potato-chicken stew. It´s a basic recipe, she said, that “admite de todo,” to which anything can be added. In fact, she has three more versions of it, one with broad beans and pork, one with cazón (an inexpensive fish), potatoes and zucchini, and another with cuttlefish. To the basic stew, she said any seasonal vegetable can be added—carrots, chard, peas, artichokes, asparagus. And, to serve more people, just add more potatoes!


Potato and Chicken Stew
Cazuela de Patatas con Pollo

Cazuela” refers to an earthenware cooking vessel, once used right in the coals of the hearth, as well as to the stew that cooks in it. Nowadays, the pan or stewpot is metal. A Dutch oven or deep sauté pan would be perfect for making this stew. 

This is one of those dishes that can be stretched to serve more people—just add potatoes. At its most frugal, it makes a filling meal with no meat or fish at all. (In my first cookbook, I have the identical recipe, but with no meat, chicken or fish.)

This one-pot meal would be the main dish for a family meal. Reme said that, typically, it would be served into a large bowl and placed in the center of the table. Family members would eat right out of the bowl. 

In past times, the “saffron” called for in the recipe was not real saffron, but colorante, a powdered yellow coloring. Today, Reme uses real saffron. While it doesn’t contribute such an intense golden hue as colorante, saffron gives the dish a subtle aroma and color. She calls for three whole cloves pounded in the mortar with the saffron, peppercorns and garlic. That’s more cloves than I am accustomed to, but I liked their spicy flavor with the potatoes. Interesting, how such small tweaks make so much difference in how a dish turns out.

Crush spices in mortar

Traditionally, the spices, herbs, garlic and almonds were crushed in the almirez or mortero, a brass or wooden mortar. A mortar is the most effective way to grind the hard spices, but the garlics and almonds are easier in a blender (add a little water if necessary).

“Start by cutting the potatoes in irregular pieces, so that when they are cooked, they break up and thicken the broth.” Use mealy potatoes for this cazuela. Their starchiness helps thicken the stew. 
Serves 4.

1 ½ pounds boneless chicken
2 pounds potatoes
3 tablespoons olive oil
1 onion, chopped
1 red bell pepper, chopped
1 green pepper, chopped
2 plum tomatoes, chopped
8 peppercorns
3 cloves
½ teaspoon saffron threads
1 teaspoon oregano
2 cloves garlic
15 almonds (blanched and skinned)
½ teaspoon pimentón (sweet paprika, not smoked)
1 bay leaf
Salt
Water

Cut the chicken into 2-inch pieces. Peel the potatoes and cut them into 1 ½-inch pieces. 

Reme stirs the cazuela.

Heat the oil in a cazuela or sauté pan. Add the onion and two kinds of peppers. Sauté on moderate until onions are softened. Add the tomatoes and sauté until they release their juice. Add the pieces of chicken and sauté, turning, until golden. 

In a mortar, crush the peppercorns, cloves and saffron. Add the oregano and grind it. Add the garlic and crush them to a paste. Add the almonds and gradually crush them until fairly smooth. Add a little water to the mortar to make a paste. Stir the spice-garlic-almond mixture into the chicken and vegetables in the pan. Add the pimentón and bay leaf. Season with 1 teaspoon salt. 

Add the potatoes to the pan and distribute all the ingredients evenly. Add enough water to cover. Bring to a boil, then reduce heat and cover the pan. Simmer gently, stirring occasionally, until potatoes are very tender, about 50 minutes. Let the cazuela settle 5 minutes before serving.

The cazuela is ready to serve. Potatoes thicken the cooking liquid. 


Accompanied by bread, the cazuela is a one-dish meal.


Reme serves a bowl of the cazuela to her mother, Francisca (Paca) Rey, 82, the source of many of the village recipes that Reme collected for her book. 


In her well-tended garden, Reme picks a bunch of acelgas (chard) for me to take home.
 
Sautéed Chard
Acelgas Rehogadas

Chopped chard is par-boiled then sautéed with garlic. 


Back in my kitchen with the bunch of chard from Reme´s garden, I found a recipe in her book for tortilla with sautéed chard.
 
Reme´s recipe notes that chard can be added to potajes (stews with legumes) in the same way as spinach. It’s also good simply sautéed with garlic, as a side dish with meat, chicken or fish or combined with eggs for a tortilla.


Serves 2-3 as a side.

1 bunch chard (½ pound)
2 cloves garlic, sliced
1 ½ tablespoons olive oil
Salt
Freshly ground black pepper

Wash the chard. Chop stems and leaves separately. Cook the stems in boiling salted water about 4 minutes. Add the leaves and cook until they are tender (about 4 minutes longer). Drain the chard well.

Heat the oil in a skillet. Add the garlic. When it begins to turn golden, add the chard. Season with salt and pepper. Sauté the chard on moderate heat until it is very tender and thoroughly heated. 

Chard Tortilla
Tortilla de Acelgas

Tortilla of chopped chard and eggs.

I added some diced cooked potato to this recipe. 

Serves 2.

Sautéed chard (above)
1 cooked potato, diced (optional)
3 eggs, beaten
Salt 
1 tablespoon olive oil

Mix chard and eggs.
In a bowl combine the cooked chard and potato, if using, with eggs. Season with salt. Heat the oil in a small non-stick skillet on moderate heat. Pour in the chard-egg mixture. Stir it a few times, then allow to cook until the eggs are almost set. Loosen the sides of the tortilla with a spatula. Place a flat plate on top of the skillet. Holding the plate tight with one hand, very carefully turn the skillet upside down, turning the tortilla out onto the plate. Slide the tortilla back into the pan to cook on the reverse side.

Lift an edge of the tortilla with a spatula and slide it out onto a serving plate. Serve the tortilla hot or cold.


Here are more traditional village recipes similar to the ones in Gastronomía Tradicional Mijeña:


Orange and Cod Salad (Salmorejo). This is the colorful salad that started Remedios on her recipe search. (Her version has green peppers too, even more colorful.) Elsewhere, the salad is called remojón or ensalada malagueña, but in our village it´s salmorejo--not the Córdoba salmorejo, which is a thick gazpacho cream.


Saturday, March 5, 2022

LEMONS GALORE AND A MARINADE FOR FISH

 
Lots of lemons!

We had to prune back the lemon tree this year, resulting in many fruit-laden branches being cut down. I´ve got lemons galore, a crate full of them, and plenty more on the tree. 


Lemons are essential in my kitchen. A squeeze of their tangy, fragrant juice adds sparkle to many foods. Fish, absolutely, but also pork chop, roast chicken, lentils, artichoke, avocado and much more. Lemon juice is a boon for low-salt cooking. It helps bring up the flavor of many foods without added sodium. Grated lemon zest adds zing to everything from pasta to veal cutlets. In Spanish repostería, lemon zest is, along with cinnamon, the basic flavoring for puddings and custards. 

I´ve still got more lemons than I can use! I don´t use more than a couple Moroccan preserved lemons in a whole year, so I won´t be making those. I don´t consume anything with sugar, so no lemon marmalade. Maybe I´ll try Indian-style lemon pickle. 

Meanwhile, here´s an easy lemon marinade typically used for fresh anchovies. After a brief (one hour) time in the marinade, the small fish are floured and fried. This preparation is traditional in Málaga, where both anchovies and lemons are always available. 

Fried fresh anchovies are marinated in lemon juice with garlic and parsley. This is a good plate for shared tapas.


A bright chopped salad to go with the boquerones. This is a winter version of pipirrana, with clementines and avocados in place of tomatoes. 


A terrific lunch--boneless fried anchovies and a citrusy salad.


Lemon Marinated Fried Fresh Anchovies
Boquerones al Limón


Filleted anchovies, before soaking.

I bought 500 grams (about 1 pound 2 ounces) of fresh anchovies (boquerones). That’s about 20-24 small fish. I was all set to clean and de-bone them myself, but the vendor quickly did it without my even asking. It´s totally easy, but messy. Use a knife to cut off the head and pull out the guts. With the knife tip, lift the spine and gently pull it down across the fish’s belly. Cut off the spine (with knife or scissors) at the tail, leaving the two fillets attached at the tail. 

After they have been filleted, the anchovies are soaked in salted water from two to 24 hours (refrigerated) to clean them of residual blood and whiten the flesh. Soaking is an optional step, useful if you don´t wish to cook them the same day as purchase.

The small anchovies need only 45 minutes to an hour in the lemon marinade to acquire flavor. Much longer and the acid of the lemon juice will “cook” the delicate flesh. The same marinade can be used with larger fish fillets, but they can be marinated for two hours or more.

Serves 4-6 as a shared tapa or 2 as a main dish.

2 dozen fresh anchovies 
Cold water
1 teaspoon salt
Lemon juice
½ teaspoon coarse salt
1 clove garlic
3 tablespoons chopped parsley
Flour
Olive oil for frying

Lift and pull out the spine.
Clean the anchovies by removing the heads and pulling out the innards. Pull out the spine and cut it off above the tail, leaving the two fillets attached at the tail. Place the filleted fish in a bowl and cover with cold water (about 2 cups). Add 1 teaspoon salt and a few drops of lemon juice. Cover the bowl and refrigerate at least 2 hours and up to 24 hours.

Crush the garlic in a mortar with the coarse salt. Add the parsley and crush to a paste. Stir in ¼ cup of lemon juice. (If preferred, this can be done in a mini food processor.)


After soaking, layer anchovies with marinade.

Drain the soaking anchovies. Rinse them in cold water. Layer the anchovy fillets skin side down, in a non-reactive container. Spread the garlic-parsley-lemon marinade over each layer. Cover tightly and refrigerate 45 to 60 minutes.

Drain off the lemon marinade but do not rinse the anchovies. Pick up a fillet by the tail and pull it between the fingers to remove most of the parsley and garlic. Place the fillets on a paper towel and pat them dry. 


Dredge fillets in flour, pat off excess.

Place flour in a shallow container. Heat the oil (360ºF)in a frying pan. Dredge the anchovies in flour and either pat off excess flour or shake the floured anchovies in a sieve to remove excess flour. Place them in the hot oil without crowding the pan. Fry until they are beginning to brown on the bottom. Carefully turn them and fry the reverse sides. They need less than 1 minute per side.

Skim the anchovies out of the oil and let them drain on paper towels. Serve hot. 


Chopped Salad with Clementines and Avocado
Pipirrana de Clementinas y Aguacate


Pipirrana is a summer chopped salad with tomatoes that is a splendid accompaniment to fried fish. This version, with clementines taking the place of the tomatoes, is perfect for end-of-winter meals. 

3 clementines or tangerines
1 tablespoon chopped scallions
1 tablespoon chopped green pepper
1 tablespoon chopped red bell pepper
1 small avocado, chopped
Salt
Red pepper flakes
3 tablespoons olive oil
2 teaspoons Sherry vinegar
Chopped parsley or cilantro 

Peel the clementines, cut them in half and cut into segments. Place them in a bowl. Add the scallions, green and red pepper and avocado. Season with salt and red pepper flakes to taste. Add oil and vinegar. Mix gently. Stir in chopped parsley. Serve the salad immediately or refrigerate, covered, up to 24 hours. 

More recipes using lemons:


More recipes with fresh anchovies:


Salad to accompany fried fish: Chopped Tomato Salad (Pipirrana)